4.05.2013

Essential Oil Travel Case

(that fits in your purse or car or pocket or suitcase or briefcase or gym bag, or backpack, or carry-on...

Thanks everyone for your emails, Yes I would love to make one for all of you that use essential oils, and though I'd LOVE to have that kind of ambition, I figured it's best to give you a DIY tutorial. 
I'm so glad though to hear about everyone that loves their oils! 
I figured out the easiest route (I think) to make this...It's infinitely easier than the first one I made, which had me pulling out my hair. So that's grand! 

IT WILL HOLD TWENTY-TWO BOTTLES!
(unlike the one below)

So first of all, you can buy 24 of the 5/8 dram bottles HERE for $8. And to buy the bottle cap stickers (the labels), go HERE and then click SHOP FOR PRODUCTS and then type in search: BOTTLE CAP STICKERS. And go ahead a do some oil shopping if you're in the market.  
Or if you're going to buy the bottles, you can buy 154 blank white cap stickers HERE for under a dollar.
I figured that this travel case is worth it because I don't have to risk loosing my large oil bottles AND I won't have to cart them around either. (I've also been known to put stuff on top of my car and drive away...and it's always expensive stuff- never a water bottle or anything).

K- so you'll need 1/8th" Elastic
Sheet of craft foam 
some fabric 
and an iron
 and lets just go from there: (umm also sewing machine and thread? Okay okay, you got it).

Cut your foam to a 7 inch by 7 inch square.
Cut your fabric to a 15.5 by 8.5 rectangle.


Fold your fabric in half so it's basically a square and then iron that seam.
Now you have two sides. One side will be the INSIDE and one the OUTSIDE.
The inside where the oils will be and the outside that's visible when it's closed.
Got it?


On the back of the fabric, line the foam square up on that newly ironed seam (and in 
the center of that one side-so there's about a 1/2" edge around the foam square). 
***
Pin it like so: Don't pin the edge of the foam that's lined up with the ironed seam.
The foam side will be the INSIDE of the travel case. Now COMPLETELY FORGET about the other side of the fabric for awhile- The side that the foam IS NOT pinned to: (except keeping it out of the way so it doesn't accidentally get sewn while we continue!)

Now sew the unpinned edge of foam (thats against the ironed seam).
When sewing any edges, get it pretty close to the edge and remember to keep it the same distance every time you sew edges here.

Now sew the other three sides of the square keeping the fabric pinned and taunt. 
Then fold the foam in half really hard so there's a visible line. 
Now sew down that line. THIS IS NOW OUR CENTER LINE.

I flipped it over BELOW so you can see the sewn square and the CENTER LINE down the middle. 
The foam side is the INSIDE of the travel case. This is where the bottles will be
Now you pick one of the two sides of the foam to be where the oil bottles will go.
I picked the oils to go on the section where my fingers are because I love the fun blue swirl and I don't want to cover it up with the oil bottles.
 Either side can hold the oils but remember that you want the top of the lids to face that CENTER LINE.


Maybe it will be easier to show you when I fold the fabric under where it is going to go. 
Now pick a side for your oils to go
 (if your fabric is an even pattern you don't even have to worry about this I guess but I'm going to put the oils on this white flower side and make sure the lids face the CENTER LINE).

Now take the elastic

Measure an inch up from the bottom stitched line of the side you picked, 
sew the elastic to the left side stitch.

Now place your bottle there and wrap around/under the closed lid. press the elastic down. and sew the elastic there too. DON'T MAKE IT WAY TIGHT. It will hold it there without it being stretched much, just barely a little stretch given. It's better to have it not stretchy than too stretched and tight.
(the bottle I'm using above is not a 2ml bottle which is why I left more space below the bottle because the ones that WILL be used will be slightly longer.) 

YAY! FIRST LOOP IS DONE!

Place the bottle and do it again.
If you need to get a ruler out and make sure it's always an inch above the bottom stitch, it might help.

When you get to the end, plan on 11 loops. Then cut off the excess elastic.
Nope haven't trimmed a single piece of thread yet :)
NOW do the top row of loops. REMEMBER that the lids come above the loops so make room for the bottles and lids.

See the back of the foam?
That's why we haven't folded over the fabric yet, we didn't want this showing.

NOW you can fold the fabric over and pull it a little taunt and pin it and double seam sew all around the 3 edges.


CHOICE: I took large double folded bias tape and made a nice edge all around it! It really polishes it up, but make sure to NOT sew the loops on accident into the bias tape...(did it obviously).
Then I found my CENTER LINE and sewed down it one last time to help with the fold of the case.


Close it how you want it! 
With bows, or a button!

YAYZERS! 
NOW YOU HAVE:
Toodles.

4.02.2013

Sewin, Trippin, Readin

I'm back from spring break and a jubilant Easter! My husband got work off and we just traveled and visited family and lived out of a suitcase all week. Now I have laundry and folding and other endless drabs to get done. (I'm such an optimist today!)

Before we left, like literally RIGHT BEFORE, I was completely packed and ready, and suddenly on a whim decided that I was going to get some sewing done that I've put off for like- EVER. Some things that I thought would make traveling more simple. Let me show you what I quickly, carelessly and slightly chaotically threw together. Though everything turned out better than I had planned on such short notice, and I need to make patterns for it all, this is what I was excited most about:

A travel essential oil case that holds TWENTY mini bottles. It's about the size of a checkbook and fits inside my purse and now I don't have to worry now, or chance losing, my expensive large sized oil bottles! I'm thinking about making one specifically for the car, because then I might be able to get down a pattern and post it on the blog as well so you can make your own!
 Look closely at the sewing job and take in the fact that I am not even close to a professional sewer...
Now snicker to yourself and keep a move on :)

We whipped up some seatbelt pillows for the long drive ahead, that ended up being quite convenient actually! I've seen a couple pinned on Pinterest but didn't end up going to any sources figuring it looked easy enough. I'll have to compare and see if they made it easier than I did.

And then a center color station for the kiddos crammed in the back seat. (You can see it to the left in the photo next to my daughter pulling her fishy face). 
I just did pockets for color/books and crayons. (this now entertains them for mini drives to the bank or to church or running errands, I would recommend it!)


The best part though was that the kids were SO STOKED and felt kinda pampered with such travel luxuries! I thought to myself that a passenger seatbelt pillow and color station wouldn't be such a bad idea eh?
 Maybe next trip!


Okay, now for the important stuff! I read a book on our trip that I desperately want you to read people.  Here's my slightly embarrassing review from my goodREADS account:

Edenbrooke

My rating: 5 of 5 stars

Oh Edenbrooke. I can't believe I'm saying this, but it was one of my favorite reads of ALL TIME. I was at a family event when my cousins and mom brought up the topic of this book. They were drooling over themselves and I hadn't even heard of it. With high expectations, this book still came out as a 10 star for me. Yup, 10. My stomach clenched so forcefully all the butterflies in the world to that one location of my abdomen. And all without the prerequisite sex scenes. It's a glorious LOVE story, not a lust story.
But even better than that for me (tho some Regency readers may disagree) is that Donaldson eliminated the sometimes entangled 1800's language and kept it simple and unconfusing. For some reason her approach of a more direct wording rather than extra fluff, made it quicker for my beating heart to come to a quick stop (unlike other Regency reads).
PLEASE. READ.


Sit yourself down and read this novel. 
Darcy who? 

That is all I have to say.

4.01.2013

Water Color Paints {homemade}


This conference weekend as a craft time with the kiddos, we made homemade water color paints. Painting with water colors is a fun past time the kids and I share together.
I decided to make these paints because it's so darn cheap and I had everything to make it in my pantry!

BUT I have some good news and some selfish news...
The Good: The paints turned out GREAT!!! Better than drugstore purchased paints.
The Selfish: I wouldn't let the kids use them! I DID promise the kids I'd make more for them, but for now, I was having too much fun and decided to be selfish with my concoction of paints. After taking the time to make 24 BEAUTIFUL colors, all I could see in my head was them mixing the colors into a goopy grey/brown mess and my selfishness took over. They got to use their regular crayola paints and I felt horrible, so I gave them a sucker. No lie.

  • 4 tbsp baking soda
  • 2 tbsp white vinegar
  • 1/2 tsp light corn syrup (I think this known as Kayro syrup in some parts).
  • 2 tbsp corn starch (known as corn flour in the UK)
  • Food colouring (liquid or gels)
  • container to keep your paints in –mini muffin tin, ice-cube tray, small plastic cups, plastic egg carton etc.
  • toothpicks 

Mix the ingredients together (except food color) in a small round bowl so you can make sure to scrape and whip/mix it really well! I'd mix the soda and vinegar together first and let it settle for about 15 seconds and then mix the rest in.
Pour into containers. This filled half of my mini ice cube tray. The cornstarch can make it hard to mix in the food color after it has set for a long while so I made 12 colors whipped up a second batch for the other half and then continued making the rest of my color blends.


I had regular food color drops as well as NEON food color drops. I put about 2-3 drops of food color in each one, but there were a couple that I even did 6, so you can go with it how ever you want! I had fun mixing 24 colors!


Look how VIBRANT they are!!
Zebra's have the saddest eyes. Even neon rainbow zebras look sad.
I did have to double paint the black because it was a more charcoal color when it dried. And my RED turned out to be hot pink when dried, which is a good day for me I guess.

I had a lot of fun and it hardly faded when dry. When it IS dry it's slightly chalky. For kids it perfect, and for me it's perfect because I'm not a professional. But if you rubbed your finger across it, you would have a chalky residue on your finger. The color doesn't come off, trust me I tried to rub it off just in case and it didn't fade with me rubbing it vigorously, but if it's a picture you want to save for EVER. Scan it and print it. because you don't want chalky residue in your file cabinet.

I'll be painting rainbows for the next few days.
-Enjoy

3.22.2013

DIY Ombre Glitter Nails


A clear glitter (I used PURE ICE)
A medium glitter (I used Finger Paints: Hue Left a Message)
A confetti glitter (I used MILANI: Fuchsia- They also have an awesome GOLD one!)

Below are two products I love. 
EZ BOND that dries up your nails and preps them for polish so your manicure lasts longer.
And Salley Hansen Hard As Nails. It's thick and yellow-y but it works and it also is a GREAT base for glitter polishes because glitter is SUCH A PAIN to get off, but this makes it so you can just peel it off.
 Prepped nails:


Let dry and apply a TOP COAT.
I'm in love with essie's SUPER DUPER TOP COAT
It lasts, it stays shiny and it dries super fast!

DONE!
I get the most compliments on this because everyone thinks it's acrylic! So easy!

RECAP DIRECTIONS:
1- File, Shape, and remove natural oil from nails (with polish remover and EZ BOND optional)
2- Apply 1 coat Salley Hansen Hard as Nails -Let Dry
3- Apply clear glitter on the top 1/3 of nail -Let Dry
4- Apply Medium glitter on bottom 2/3 of nail -Let Dry
5- Apply Medium glitter again in same spot and then slightly blend up into part of the clear glitter -Let Dry
6- Apply gobby french tip with confetti glitter
7- Spread/blend back unevenly leaving most of the confetti glitter at the tip -Let Dry
8- Apply top coat -Let Dry 

I'm headed out for spring break vacation 
for a week and LOTS of driving! 
See you after EASTER!

3.21.2013

Thrifting and Biffing


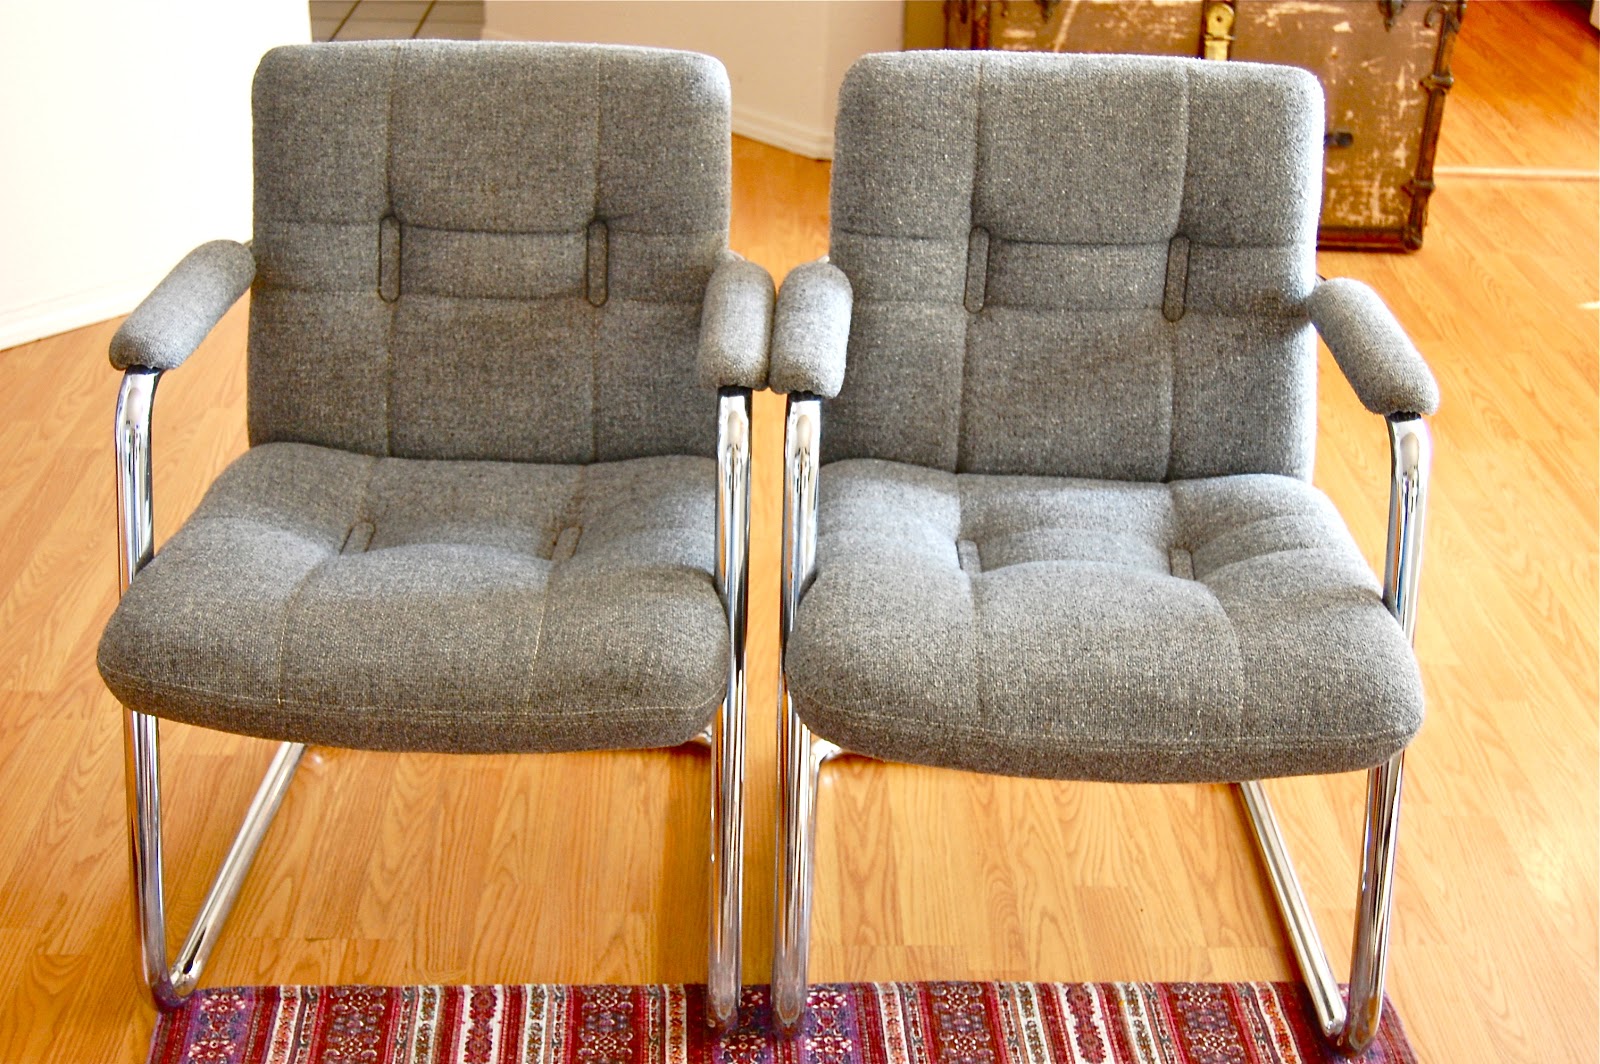
I've been long searching for some sort of seating for my family room because the only thing that currently resides there is a white futon, though adorable, barely ample for seating as it has zero comfort.
I went thrift store shopping with a budget of $20.  And after my long searching, I finally found two matching chairs with no wear n' tear that fit my style! I claimed them, paid for them and then I drove around back to pick them up. That's where the 'biffing' came into play...But now that I think about it, I really could have prevented such a tragedy.

Problem #1: I was wearing a pair of crocs, yes the rubbery formidable footwear. It was raining. My crocs were wet. The nice man that was going to load my chairs into my tiny compact car couldn't seem to find my recently purchased merchandise, and he asked if I would come show him which ones they were.

Problem #2: I agreed. As soon as I stepped into the back of the store with such nice dry glossed cement flooring, my crocs couldn't handle such polish and they wavered. And I biffed it. I biffed it super uncoordinatedly hard. It was all slow motion. My feet were slipping every direction. As soon as I would try and catch up with one foot the other would falter. And I continued like this for quite some time. 

Problem #3: I grabbed at anything that might be my salvation. I grabbed and grabbed and grabbed, but everything kept falling on or around me. Shelves were knocking over in a domino like fashion, I grabbed and pulled at a pulley cart that shot across the room and collided right into the nice man and another shelf. At some point I smashed my knee into the floor and then finally...FINALLY landed on my back. 


Though I was completely discombobulated and lying under everything, I still came out on top with two cute chairs for $10 each!


My husband thinks it's his homework chair...
(Don't you LOVE the suspended seating?)


But you won't hear me complain because... he's doing my dishes while I blog...


What we've learned today: Don't combine rubbery crocs and thrift shopping.

Love you all-
Linds


P.S. No one was seriously injured (including myself) in my unfortunate fall. My knee is a little black and blue, but bendable! 


3.17.2013

Happy Snt Patty's

My kids were a LITTLE freaked out that a Leprechaun might give them a pinch if they didn't surround themselves with green. We had a 'sick' day from church today after spending a morning cleaning up puke and washing sheets. Thank you oldest son, (and thank you red strawberries) :P
 I saw this printout at Dating Diva's but I don't have color ink so I made my own. My husband is THEE best person I've ever known, and so instead of making a printout and giving it to him, I'm putting it up here for EVERYONE ELSE to see How LUCKY in love I am! 


I have a super-husband. He had a church meeting at 8 this morning & at 9 and another one at 10, then church from 11-2 and then rush home and off to work.
Thanks for being you, and I love you Josh.
Leap Year Movie night tonight and a foot rub for the Man of the Year!


P.S. Yes my husband looks like Elvis! He's a hip shaking hotty-pa-totty!

3.15.2013

Vibrant Living Granola Recipe


It's to die for. You can eat it so many different ways. It's healthy, but no one would know it was sugar free. It makes your house smell like YUM on a stick and EVERYONE will compliment your house aroma and may even start licking the air. IT'S SO GOOD. SO SO GOOD.

It's amazingly versatile! 
You can have it as a sweet-tooth snack, you can add add-ins for a trail mix, it's a delicious cereal all on it's own, put it on top of ice cream, over a baked apple or baked pear (wholly yum), on top of muffins or bread in the oven, on hot oatmeal, on fruit crisps instead of flour/sugar/butter, and our all time FAVORITE way to eat it...
Some honey yogurt & some fruit.
Breakfast of champions.   Parfait of Deliciousness. 


Vibrant Living Granola

INGREDIENTS:
3 c. Old Fashioned Oats
1.5 c. Unsweetened Shredded Coconut
2 c. Mixed Seeds/Nuts (See below for what I prefer)
1 tsp. Cinnamon

1/4 c. Real Butter
1/8 c. Coconut Oil
1/2 c. Honey
1 tsp. Vanilla
1/4 c. Chia Seeds (optional)

1: In a large bowl, mix the Oats, Coconut, Seeds, and Cinnamon. 
2: In a medium sauce pan, warm the Butter, Oil, Honey, and Vanilla. When it's all melted, (don't bring it to a boil or anything) mix in the Chia Seeds.
3: Poor the wet into the dry ingredients and stir until well distributed. 
4: Spread granola onto cookie sheet and bake at 185 degrees for 3 hours and then turn off the oven and leave it in the oven over night. 
4a: If you have a large crock pot, you can put ALL the ingredients into it and cook it on low for about 6-8 hours or until golden crispy. Stir occasionally. It really turns out GREAT, but I enjoy the 'toast' of the oven a touch better. But crock pot is less cleaning up afterwords! 

{I double the recipe and place onto 2 cookie sheets and put them both in the oven and bake for 4 hours. We go through the granola quite quickly, so this allows me to freeze some and it keeps me from having to make it once every week}.

Seeds/nuts in a bowl:
I use raw pumpkin seeds, raw sunflower seeds and little bit of sliced almonds
 Coconut:
 Old Fashioned Oats:
 Cinnamon: 
 Warm and liquify the other ingredients:
 Read with son while it warms:
 Remove from heat and pour in Chia Seeds:
 Pour liquid over mixture in bowl:
 Bake!
Below are two big containers I put in the freezer and one I refill and keep in the cupboard for daily use.

You won't be able to get ENOUGH of this stuff!

LinkWithin

Related Posts Plugin for WordPress, Blogger...